| |
When you use Flash to create animation for your Web site, you generally go through several steps of construction. The steps might vary in their order, depending on your situation. After you know the basics, you can start getting creative and make your Web site rock. Here’s a typical path to add animation to an existing Web page:
1. Think about it. Noodle around, maybe make some doodles on a napkin, collect a few ideas, and choose one or all of them.
2. Set up your movie. Flash lets you choose the size and color of the Stage, the speed of animation (number of frames per second), and other general parameters that affect the entire Flash movie. See the next section of this chapter for details.
3. Add some graphics. You have to decide whether you want to create graphics in Flash, create them in another graphics software package, or import existing graphics. Your choice partly depends on how artistic you are, whether you have other software available to you, and whether you can find the right graphics elsewhere. You can also use a combination of sources, which is a common practice.
4. Lay out your graphics the way you want your animation to start. Here’s where you might want to scale, rotate, or otherwise fiddle with your graphics.
5. Add some text. Using Flash is a great way to get terrific text onto your Web site. Add text (also called type); then reshape it, make it transparent (if you don’t want to be too obvious), add other effects, and move it where you want it.
6. Organize your text and graphics by using layers. Layers help you keep track of what each graphic and text object does while you organize everything into a powerful, coherent statement. Layers keep your animations from going bump in the night and getting entangled. Create as many layers as you need and transfer your existing graphics and text to those layers.
7. Turn a graphic into a symbol and multiply it all over the Stage. Making objects into symbols is a way to keep them from merging with other objects while they merrily animate. You also use symbols to keep the file size down and to enable animation, as well as for interactivity, especially buttons.
8. Design some buttons. You know those buttons you click on Web sites all the time? The coolest ones are made in Flash. You can even use movie clips to create animated buttons.
9. Animate! You can create your animation frame by frame or let Flash fill in the animation between your first and last frames, which is called tweening. Flash can tween motion, shapes, colors, and transparency, which means that you can create some real magic.
10. Get interactive. You want to start a relationship with your Web viewers, so you can create buttons, frames, and symbols that respond to your viewers’ actions. This is probably the most complex functionality of Flash, but we make most of it seem easy.
11. Make it louder! Make it move! Who wants a quiet Web site? Add sound to your movies or your buttons. You can also add a video file.
12. Publish your magnum opus. Flash makes getting your movie to your Web site easy by creating both the Flash Player (.swf) file and the HyperText Transfer Language (HTML) code for your Web page. Flash has other options, too, so you can publish to other formats if you want.
Before you create graphics and animate them — all that fun stuff — you need to make some decisions about the structure of your entire movie. You should make these decisions before you start because changing midway can create problems. The first step is to decide on the size and color of your Stage and other fundamental settings. Make sure that the Property inspector is open (choose Window➪Properties➪Properties). When the Stage is active (just click the Stage), the Property inspector looks like Figure 2-1.
2 - 1

Choosing the Stage color
You can set the color of the Stage to create a colored background for your entire movie. Like with other settings, you need to consider the context of the Web page that will contain the Flash movie. For example, you might want to match the color of your Web page’s background. If your Flash movie will constitute the entire Web page, set the Stage color to the color you want for the Web page background. You can also color the Stage to create a mood for your animation. To set the Stage color, click the Background color swatch in the Property inspector. Flash opens the Color palette. Click the color that you want.
Specifying the frame rate
In the Frame Rate text box, specify how many frames that a Flash movie plays each second, and then press Enter (Windows) or Return (Mac). A faster rate allows for smoother animation but might present a performance problem on slower computers. The Flash default is 12 fps (frames per second), which is a good starting point. But changing the frame rate midstream in the creation process changes the\ rate of all theanimation in your movie, which might not give you the results that you want.
Setting the Stage size and adding metadata
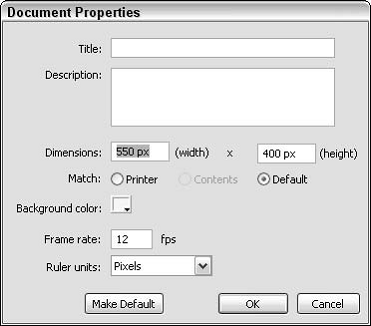
The Size button displays the current size of the Stage. By default, Flash uses a Stage size of 550 pixels wide by 400 pixels high. To determine the proper setting, you need to know how your Flash movie will fit into your Web page or site. The default fits on almost everyone’s browser screen. You might, however, want to fit your movie into a small corner of a Web page: for example, placing an animated logo in a top corner of a page. In that case, make the Stage smaller. To change the Stage size, click the Size button to open the Document Properties dialog box, as shown in Figure 2-2. Type the dimensions that you want in the width and height text boxes.
2 - 2

Grabbing a Graphic
The first step when creating animation for your Web site is usually to create or import graphics. First, you should know a little about the different kinds of graphics that you can use in a Flash movie.
Understanding vectors and bitmaps
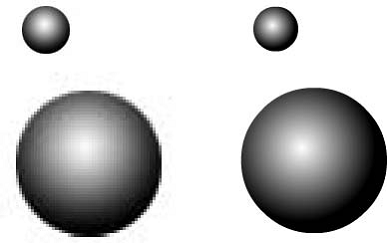
If you know enough about graphics to understand the difference between bitmap and vector graphics, feel free to skip this section. (We hope you always feel free.) Bitmaps are created with lots of dots. Put them all together, and you get a picture. On-screen, they’re displayed as pixels. As you can imagine, it can take a large file to store the information about all the dots in a bitmap. Another problem with bitmaps is that they don’t scale up well. If you try to enlarge a bitmap, it starts to look grainy because you see all those dots (as in the left example shown in Figure 2-3).
2 - 3

Vector graphics are defined with equations that specify lines, shapes, and locations. Blank space doesn’t have to be recorded, and the equations are particularly efficient at storing information. As a result, file sizes are usually smaller than bitmap file sizes. Vector graphics are infinitely scalable, either up or down. No matter how big you make your graphic, it always looks perfect, as shown in the right example in Figure 2-3. In fact, your graphic might even look better when it’s larger because the curves are smoother. Flash creates vector-based graphics. The small size of the files means that Flash Player files load and play super-fast on a Web page. As you undoubtedly know, fast file-loading means that your Web page viewers don’t have to wait a long time to see your effects.
Finding graphics
Okay, so you’ve doodled and played around with some ideas for your Flash animation and perhaps jotted down a few notes or maybe even made a few sketches. You’re ready to start building your Flash animation. A logical place to start is to collect some of the graphics that will serve as building blocks in this process.
Where do you get them? You have several choices:
_ Create your graphics from scratch (if you feel artistic) by using the Flash drawing tools.
_ Create graphics in another graphics software package, such as Fireworks or FreeHand.
_ Import graphics from archives of art available on this book’s Web site, from other places on the Web, or from digital (or scanned) photographs — perhaps your own.
_ Combine any or all of these approaches.
Using a Template
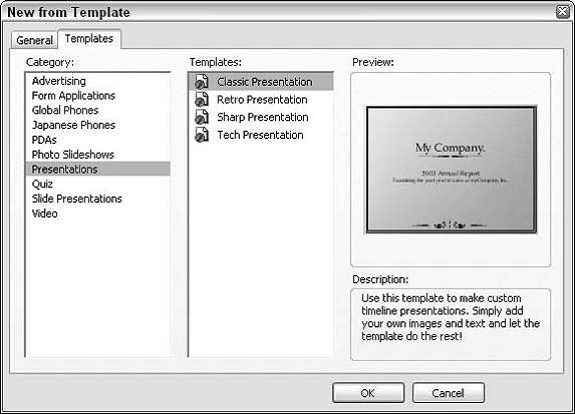
To help you create Flash movies more easily, Flash 8 comes with a few templates for common types of movies. Instructions are included on the templates. To create a Flash movie from a template, choose File➪New and click the Templates tab. In the New from Template dialog box (see Figure 2-5), select a category, select one of the templates, and then click OK.
2 - 5

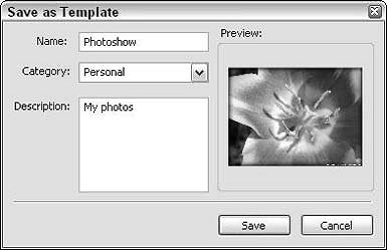
When you open a new movie from a template, you should save it as a movie. This way, the template is unchanged, and you are free to make any changes that you want. You can also save movies as templates. If you create a movie that you want to reuse in many variations, choose File➪Save as Template to open the Save as Template dialog box, as shown in Figure 2-6.
2-6

Type a name, choose a category, and enter a description for your template. Then click Save. From now on, you can open your template just like any of the templates that come with Flash, just as we describe. Using templates can save you lots of work! To create your own category for templates, type a category name in the Category list box instead of choosing one of the existing categories from the list. Printing Your Movie Usually, you don’t print your movies — you publish them on the Web. But you might want to collaborate on a movie with others who don’t have Flash. (How unenlightened of them!) Or, you might just want to analyze a movie on paper, tack your animation frames on the wall, and rearrange their sequence. In this type of situation, you can print your animation frame by frame. To print a movie, follow these steps:
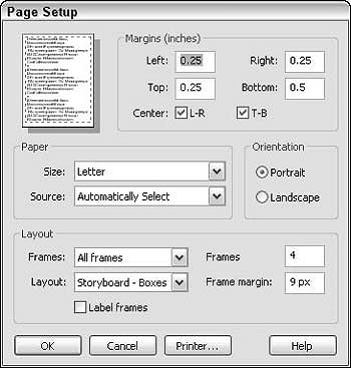
1. To set page margins, choose File➪Page Setup (Windows) or File➪ Print Margins (Mac). The Page Setup (Windows) or Print Margins (Mac) dialog box appears, as shown in Figure 2-7.
2 - 7

2. In the Margins section, set the margins. You can probably keep the default margins.
3. Select the Center check boxes to center the printing horizontally (L–R) and vertically (T–B) on the page.
4. In the Layout section, click the Frames drop-down list and decide whether to print only the first frame or all frames.
5. Click the Layout drop-down list in the Layout section to choose from the following options: • Actual Size: Lets you choose a scale. This option prints one frame to a page. • Fit on One Page: Fits one frame on a page, scaling it to fit the paper. • Storyboard – Boxes: Places several thumbnail sketches of your movie on a page. You can specify how many frames that you want in a row in the Frames text box. You might need to experiment to get the right result. In the Frame Margin text box, enter in pixels the space between the boxes. The Storyboard – Boxes option places each frame in a box. • Storyboard – Grid: Creates a grid of lines for your storyboard rather than individual boxes around the frames. This option is just a matter of aesthetics — don’t get too hung up over these choices. • Storyboard – Blank: Leaves out the boxes or grid and just prints all your frames in the storyboard. You have the same Frames and Frame Margin settings as for the other storyboard options.
6. If you chose a Storyboard option, select the Label Frames check box (Windows) or Label (Mac) to give each frame a number.
7. On a Mac, when you finish setting your options, click OK; then choose File➪Page Setup. In Windows, you skip this step because you already opened the Page Setup dialog box in Step 1.
8. Select the size of the paper; (Windows only) define the paper source in the Paper section. Usually you can leave this section as is because it’s based on your printer’s default settings.
9. In the Orientation section, select Portrait (taller rather than wider) or Landscape (wider rather than taller).
10. (Mac only) In the Format section, choose your printer from the dropdown list.
11. When you finish setting your options, click OK.
12. (Windows only) If you chose a storyboard option, choose File➪ Print Preview to preview your movie to ensure that you like the setup. Click the Close button to return to the regular display.
13. To print, choose File➪Print. Alternatively, you can press Ctrl+P (Windows)
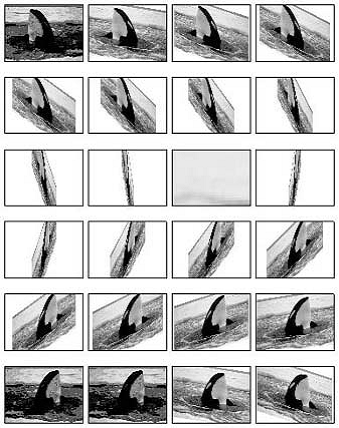
Figure 2-8 shows an example of the storyboard with the grid option. The storyboard shows four frames across with a portrait orientation.
2 - 8

|
|
